Blending with Carders
I taught myself a new skill today so I thought I'd share it with you all. Of course I'm probably doing it all wrong but it worked for me. I've tried blending on our wild carder but could never get a nice smooth batt to spin with. I've realised that blending fibre using a carder works much better and takes very little work. The photos are in order below. It was fun trying to take them one handed. Big thanks to the Boy for helping.
1. Pick your fibre. I used commercially dyed and carded merino tops

2. Pull off small amounts. I used 2 colours as a base and 4 more as accents. The ratio was about 2 - 1 base colour to accent. I wasn't too precise about this however. I was more interested in getting a nice random mix.

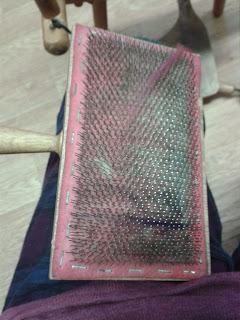
3. Lay the carder on your knee.
4. Taking the end of the first base colour in one hand comb it through the carder starting at the edge. I held the fibre at the end so that the teeth on the carder could pull out the staple without fighting my fingers as I dragged it across them.

5. Add the next lots of fibre in the same way in whatever order you like. I worked my way up the carder so each layer overlaps the previous layer rather than lying directly on top.


6. When you've filled the carder with fibre lay it on your knees so its secure and the handle points towards you.

7. Peel the fibre off carefully by rolling it towards you into a tube (a rolag).


8. Spin from one end.


I found this made really nice rolags to spin with.


1. Pick your fibre. I used commercially dyed and carded merino tops

2. Pull off small amounts. I used 2 colours as a base and 4 more as accents. The ratio was about 2 - 1 base colour to accent. I wasn't too precise about this however. I was more interested in getting a nice random mix.

3. Lay the carder on your knee.

4. Taking the end of the first base colour in one hand comb it through the carder starting at the edge. I held the fibre at the end so that the teeth on the carder could pull out the staple without fighting my fingers as I dragged it across them.

5. Add the next lots of fibre in the same way in whatever order you like. I worked my way up the carder so each layer overlaps the previous layer rather than lying directly on top.


7. Peel the fibre off carefully by rolling it towards you into a tube (a rolag).


8. Spin from one end.


I found this made really nice rolags to spin with.


Comments
Post a Comment