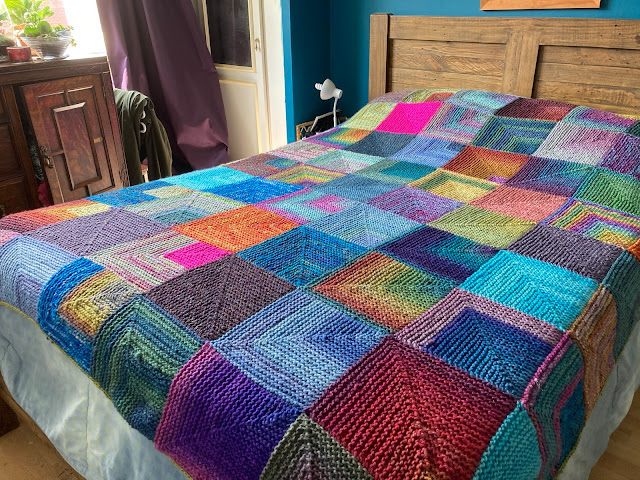
No Sew Mitred Square Blanket and the point of knitting!
 |
| No Sew Mitred Square Blanket |
This was one of those projects that made me consider why I knit. I don't need a blanket. I spend most of my time overheating, especially at night so actually a blanket is probably the last thing I need. I did have a huge amount of fibre from my Mum's stash, which prompted the idea.
 |
| A small selection from mine and Mum's stash! |
I'm finding spinning very soothing at the moment, with all the crazy going on. But why a blanket? I love to knit mitred squares. They way they get smaller as you make them, the look of the stripes as they form that distinctive V. I made a jacket a couple of years ago, well more of a coat really, with the huge amount of 4ply yarns I have. That started life as a blanket, but morphed into a coat as I was working it.
 |
| Me in my Mitred Square Coat |
 |
| Rainbow fibre from Crafty Catty Knitty Bits having been chain plied and then skeined up |
It was the little happy lift of receiving parcels through the post with fibre goodness in them, and the anticipation of how they would spin, and then knit up.
 |
| A fibre parcel from Dancing Goat Crafts, with little extras to make me smile |
It was the quiet pleasure of seeing the yarn I had made forming beautiful squares one by one, and then seeing them grow and contrast with each other.
 |
| Mitred Square in rainbow colours |
Once it got big enough it was wrapping myself underneath it as I worked on each square. It was keeping my hands busy as we watched TV so I didn't think about food!
 |
| Wrapped up underneath it as I knitted each square |
It was the pride that swelled as I laid it over the bed every now and then to see how it was shaping up, and that feeling of exaltation as I could see it working out how I'd imagined.
 |
| Checking the fit as I went along |
All these things have been the purpose of the project. The blanket is really just the bonus at the end.
The fibre came from a variety of places. My Mum's stash, my own hand dyeing, my stash. I bought some beautiful colours from the people listed below. I'd highly recommend checking them out.
https://www.etsy.com/uk/market/dancing_goat_crafts?ref=rlte_std_4
https://www.etsy.com/uk/shop/CraftyCatKnittyBits
https://www.etsy.com/uk/shop/YarncandyCrafts
I took notes as normal so I've written them up and posted them below, in case you want to make your own No Sew Mitred Square Blanket.
No Sew Mitred square blanket
The idea with this pattern is that you can use any yarn and make whatever size you want. Use the recommended needle size for your yarn and a circular needle 60cm cord, and cast on an odd number of stitches.
Knit to centre 3 sts, s1, K2tog, psso, Knit to end
Knit
Repeat last two rows until 3 sts remain
On the wrong side s1, K2tog, psso. Leave last stitch.
The following sets the pattern for a cast in of 53sts
K25, sl1, K1, psso, K25
Knit
K24, sl1, K1, psso, K24
Knit
K23, sl1, K1, psso, K23
Knit
K22, sl1, K1, psso, K22
Cont decreasing 1 stitch either side of the centre decrease until 3 stitches are left
On the wrong side sl1, K1, psso.
Leave last stitch.
For 53 stitch cast on you will pick up 25 stitches across last square worked (26 sts with the last stitch left from the last square) and you will cable cast on 27 stitches (53 sts total)
Repeat the square pattern as set above
Work as many squares as you want for the first row following the same process above.
Work square pattern. Repeat the last paragraph for the remainder of the row.
Work the square pattern starting from row 2 (you have worked row 1 already when you cast on your stitches for this square).
For each of the next squares pick up the stitches in the same way as on row 2 but from right to left. Join in the new colour with the right side facing and on the right side of the square. Work the square pattern as normal.
Work the odd and even rows in turn until your throw is big enough. Leave the last stitch to begin the edging
With right side facing pick up the stitches along one square (25 sts for a 53 st cast on). K2, cast 1 st off, *K1, cast off* repeat across the square. Once you have 1 sts left pick up the next square and repeat. Work your way along the edge of the blanket to the first corner stitch. Kfbf into the corner st. Slip 2 sts back to the left needle and cast off the 3rd, slip the next st back to the right needle and cast off 1, slip the last stitch to the right needle and cast off 1.
Continue picking up stitches and casting off all the way around, working the corners as above. Fasten off and weave in tails. Block lightly. Snuggle underneath!


Comments
Post a Comment